| View previous topic :: View next topic |
| Author |
Message |
learfxr

Joined: 19 Mar 2005
Posts: 62
Location: DFW Texas
|
 Posted: Thu Mar 31, 2005 12:18 pm Post subject: Dash repair project Posted: Thu Mar 31, 2005 12:18 pm Post subject: Dash repair project |
 |
|
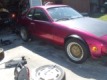
I wanted to clean up the interior of my 82 924. Like so many other people I wished I could find replacement dash without taking out a small loan with the bank. I was directed to another web forum today that talked about a method for repairing the original dash of the Porsche cars. I took this persons advice and drove into town and bought the products to perform the job.
From what I gather on the other web forum you have to remove the dash first of all. Then sand down the part of the dash you wish to repair, in my case I plan to do the entire dash and some other items as well. Then you use a bondo style resin with fiberglass in it to fill all the cracks and smooth out the dash. Then sand it down and apply a spray on texture from SEM that is for automotive parts. It is supposed to simulate the same texture of the original plastic and vinyl parts, I guess. We'll see. Then you spray on the interior paint, also from SEM. I'm using thier Landau Black color as suggested on the other web forum.
I took a few pics of the tear down from today. It didn't take too long to get everything out and on the floor. I left for the paint store (at least 20miles one way) at 2:30pm, came back and started the tear down, found that I needed to remove the steering wheel and didn't have the right socket, so that prompted a trip to O'Reilly's for tools, then finished parts removal and picture taking by 6:00pm. If was interesting trying to figure out where the screw were hidden for some things, but it wasn't too bad. Most of my tools are at work, which is 70 miles away, so I'm left with what I have at home. And most of my tools are SAE because Learjets don't use metric hardware, so I have a small amount of metric tools from working on cycles and cars.
Let me know if you guys want me to continue posting the progress of the work, or otherwise I'll just focus on getting it done and not take any pics.


 |
|
| Back to top |
|
 |
924guy
Joined: 29 Dec 2003
Posts: 2088
Location: Port St. Lucie, FL
|
| Posted: Thu Mar 31, 2005 1:40 pm Post subject: |
|
|
cool, way to jump in with both feet!! by all means, keep posting project pics, i think itll be helpfull stuff...
_________________
Eric
78 924
82 931 SE "smokey"
99' VehiCross
Y2K Honda Insight
http://www.cardomain.com/id/924Guy
Performance by Pasha |
|
| Back to top |
|
|
learfxr
Joined: 19 Mar 2005
Posts: 62
Location: DFW Texas
|
| Posted: Thu Mar 31, 2005 1:59 pm Post subject: |
|
|
If anyone has questions I'll try to answer them. This is my first Porsche and the first time I've tried this kind of work. I'm just using info provided on another forum (Rennlist I think). I'm only 27, so there's lots of things I haven't done yet.


I'm curious about what caused the melting and warping on my glovebox. I could tell most of the interior has been out of this car before, so it may have a strange history. Could a ruptured heater core cause this if it's nice and hot? It doesn't appear to be from a fire because there's no soot or signs of burns from open flame. So, I guess I'll probably replace the glove box some day. It's all hidden damage, so it's not a big deal yet.
 |
|
| Back to top |
|
|
macBdog

Joined: 16 Aug 2004
Posts: 1111
Location: Brisbane, Australia
|
| Posted: Thu Mar 31, 2005 2:40 pm Post subject: |
|
|
That last picture looks like a close up profile shot of a massive black nose. Whoops that was a completely useless post.
_________________
1979 931 with a 350 chev
1973 911E with EFI
| p-talk wrote: | I'm still convinced the word 'Porsche' makes people crazy in all kinds of ways  |
|
|
| Back to top |
|
|
HappyPuppy

Joined: 04 Jan 2003
Posts: 114
Location: Chattanooga, TN USA
|
| Posted: Thu Mar 31, 2005 3:33 pm Post subject: |
|
|
first off, kudos to you for taking the 924's worst nightmare head on--I can't remember his name, but the member with the "bahama yellow" 924 did something similar with his dash a while ago.
BTW for those guys who aren't as particular about thier dash, or don't have much money, try recovering the dash in cloth. It's cheap and easy--unlike so many other things--and if you pick a good fabric, won't fade for at least a few years.
_________________
My frequent desire to perform violent acts on select other drivers is not road rage; it is simply preemptory self-defense. |
|
| Back to top |
|
|
The Fife
Joined: 17 Mar 2004
Posts: 241
Location: San Antonio, Texas
|
| Posted: Thu Mar 31, 2005 11:12 pm Post subject: |
|
|
| Can I get a picture of where the defroster vent cable runs? |
|
| Back to top |
|
|
Porscheaddiction

Joined: 03 Nov 2002
Posts: 431
Location: Cornwall, Ont, Canada
|
| Posted: Thu Mar 31, 2005 11:57 pm Post subject: |
|
|
This is insprratiional ... makes me think of tackeling mine soon...yes please keep the pics of the process coming...ty
Chris
_________________
1981 924 NA (Restoring mode)
1984 928S (Enjoying the driving season) |
|
| Back to top |
|
|
learfxr
Joined: 19 Mar 2005
Posts: 62
Location: DFW Texas
|
| Posted: Fri Apr 01, 2005 1:11 am Post subject: |
|
|
| I'll look for the defrost vent cable for you. I'll try to have pics of it tonight if possible. |
|
| Back to top |
|
|
Chrenan

Joined: 15 Jan 2003
Posts: 3903
Location: Canada
|
| Posted: Fri Apr 01, 2005 1:48 am Post subject: |
|
|
Wow! Congrats indeed on jumping in with both feet!!! That's great to see, keep the pictures coming.
As for the melting on the glove box, any chance it was from battery acid sloshing around? I know the battery box is prone to rust, and if it developed a hole at the back end of the box, and the drain holes at the front of the box plugged, water and battery acid could have gone in the direction of the glove box. Worth a look. If not that I vote for some type of engine compartment fire causing the damage, but that would be noticeable I would think...
_________________
1987 951 - M193 Version for Japan |
|
| Back to top |
|
|
learfxr
Joined: 19 Mar 2005
Posts: 62
Location: DFW Texas
|
| Posted: Fri Apr 01, 2005 2:34 pm Post subject: |
|
|
Well, there's no turning back now. I removed the last of the air vents and plastic parts for the switches on the dash. Then I used a razor blade to open up most of the large cracks. My goal was to create more of a "V" shape in the crack area and clean out some of the loose foam underneath. I sanded the entire area with my electric sander to prep it for the bondo. My dash had several areas that warped when it cracked causing high spots. I had to do alot of material removal to bring those areas back down. I cleaned the dash with paper towels and alcohol to get it ready for bondo. I mixed the bondo in small amounts like the can said, which is good because it will set up before you get very far. I think I put too much bondo on the first time, which meant lots of sanding. I was using some pretty aggresive paper in the electric sander to try and remove the large area of bondo. I tried to get most of the dash surface leveled back out and fix the high and low areas. I had a few spots that needed touched up with another round of bondo. I'm now to the stage of trying to get it smooth enough to apply the texture spray. I'm hoping to get the sanding finished tomorrow and get the texture spray finished. I still plan to rewire the stereo while I have everything out, so I want to get this dash finished and get on with the rest of the work I have planned. I also got the first of my new parts in the mail today. I ordered new hood dampers, two new door stops, a new dome light and a jack adapter. I'm expecting more parts tomorrow. I'm hoping my sunroof seals get here tomorrow, I ordered them last Friday. When all of this is finished I need to work some overtime at work and get my carpet and front seats fixed up.


Hopefully tomorrow I will have an almost finished product to show. I'm pretty picky, so I have to get the dash nice and smooth before texture and paint. |
|
| Back to top |
|
|
Modoc

Joined: 22 Dec 2004
Posts: 155
Location: Rexburg, Id / Fremont, Ca
|
| Posted: Fri Apr 01, 2005 6:13 pm Post subject: |
|
|
| wow extremely amazing... Once your done if your done give us an estimate on what you spent if ya dont mind, i have the begging of cracks on my dash, i ran strait out and bought a cover... to keep it from getting worse... |
|
| Back to top |
|
|
Paul

Joined: 02 Nov 2002
Posts: 9491
Location: Southeast Wisconsin
|
| Posted: Fri Apr 01, 2005 10:02 pm Post subject: |
|
|
| While you have the dash out, you might want to clean the ground connections and take a good look at the heater core. |
|
| Back to top |
|
|
Helstrm

Joined: 05 Feb 2005
Posts: 198
Location: Columbia, SC
|
| Posted: Fri Apr 01, 2005 11:10 pm Post subject: |
|
|
| I am doing the exact same thing on mine as we speak... Got the tips from rennlist 928 thread. Cost is next to nothing... Sanding is neverending... It is hard to get all the littl inperfections out of the bondo.. But it is better then buying a used dash that will crack soon anyway. I am considering covering mine in leather now that all the cracks are fixed. I coated the entire dash thinking that it will look better in the end. We will see. |
|
| Back to top |
|
|
learfxr
Joined: 19 Mar 2005
Posts: 62
Location: DFW Texas
|
| Posted: Sat Apr 02, 2005 2:04 am Post subject: |
|
|
| Sanding this stuff is not much fun. It's pretty solid when it sets up. I think it cost me around $40 for the three cans in the picture. I already had the sandpaper that I'm using. |
|
| Back to top |
|
|
emoore924
Joined: 13 Apr 2004
Posts: 2822
|
| Posted: Sat Apr 02, 2005 2:57 am Post subject: |
|
|
You might know this already but for everyone else...
PLEASE PLEASE PLEASE BE SURE YOU USE THE RIGHT KIND OF RESPIRATOR IF YOU'RE SANDING DYNAGLASS!!!!
You really, really don't want to breathe that stuff in. And, you might want to be sure your work area is properly ventilated. Small particles of that stuff can get all over the place and cause glass dust to be kicked up for months/years.
It looks great. Be sure to post pics of the finished product. |
|
| Back to top |
|
|
|

